26 Mar 2013

Sky Broadband and Third Party Routers

Had any problem connecting a third party modem/router to Sky? Well, have a read of this... I'm still a darker shade of purple as I type... Or if you've had a gutsful of other people bellyaching, skip to the solution section, I won't hold it against you. :)

Background

On Wednesday evening, my Sky Broadband modem/router broke. Dead. I had a backlog of school work to get through - marking work posted to our Moodle site, etc, so it was imperative that I got back online as soon as possible. I went down to my local 24-hour Tesco superstore and bought a shiny new TP-LINK TD-8961ND Wireless Modem Router for about £35. Okay, so a little pricey, but at short notice, not too bad.

Anyway, got it home, inserted the setup CD and tried to connect. All systems go except for the bit where it asked for connection details (username and password). I tried everything. Nada. Okay, just phone Sky for the details and I could be on my way.

I spoke to a lovely operator, who told me that they didn't have any training with regard to third party modem routers. I assured her that I didn't need support with the modem, just my Sky username and password. No... no idea of what I was talking about - and I was assured that nobody in the office had any idea either. I was told that a new Sky modem router could be sent out in 3 working days. That made it Saturday or Monday, depending on your definition of working day. Oh, one more thing, I would be charged £35. No, says I, I don't want to fork out another £35 as I have a perfectly good model fresh out of the box. She said that I could get a free modem router if I swapped over the landline (from BT) to Sky. There was no real difference in price, so I thought what the hell. I enquired whether they had a preferential delivery service - but no, no they didn't. What did I expect?

Saturday came and went - nothing. OK, Monday then. I thought I'd give Sky a ring to confirm that the item would be delivered today - after all every company has order tracking now right?

I was answered by a polite young lady, whose non-native accent was so strong that I had great difficulty in understanding her. Nevertheless I understood her well enough to ascertain that my request hadn't been logged until Saturday. That's strange I countered as confirmation of my change of landline rental had arrived this very morning. How come? After a lot of umming and ahhing, I was told that her supervisor would get back to me within the hour. Okay now we're getting somewhere.

I held off going out as the super was going to phone my landline. One hour became two, became three... Okay, this was getting ridiculous. Then a phone call... from BT asking me to confirm that I wanted to switch my landline from them. Then came the hard sell. I fobbed them off, as I didn't want to be on the phone while Sky were trying to contact me. Finally, I telephoned Sky again.

This time, I was greeted by a delightful young man, who was extremely helpful and very apologetic. He offered to contact the Royal Mail to track down my order. After 5 minutes of listening to some banal music, he came back with some bad news. The Royal Mail, he claimed, couldn't track the location of my item, but could confirm that it had been dispatched. Fat lot of help. With regard to the third party modem router, he offered to put me on hold again while he discussed with his supervisor. Another five minutes later - this time without the soul-destroying musical interlude - he came back with more bad news. He'd asked 3 different supervisors and none of them could help. I asked him why, out of all the ISPs out there, how is it that they could not supply me with my connection details. I was given, what I assume to be the party line. "Security and my protection". Nothing to do with control and making even more money then? Perhaps that's a bit harsh, but how do other ISPs allow third party modem routers? Are they fundamentally unsafe and deserving of a blast of hellfire up their derrières? Anyway...

I then hit on the idea of cancelling the whole comms package with Sky and signing up with BT. So I gave them a ring - thinking I could use my new hardware to connect today. How naïve. I was told that I needed a migration code from Sky and that it would take five working days to connect me from receipt of said migration code. Darn, square one. I fell back on my son's wireless hotspot app on his smartphone. Two hours of searching on various forums led me in circles and I was about to give up when I hit upon a thread which answered all my needs. I have implemented the advice and now have access to Sky Broadband via my TP-LINK modem router. However, I may be in breach of my Sky contract. If I get blocked, I'll simply cancel my subscriptions and go with somebody I can trust. I may do so anyway, I'm that fed up with them. What follows is the route to my success. Please be aware that I take no responsibility for anybody who repeats these steps. Read all the caveats in the various links and come to your own decision. This is simply "my story".

Solution

I came across this thread: http://www.skyuser.co.uk/forum/extracting-sky-router-passwords/47888-username-pw-dead-sky-router.html#post364848 which then led me to this one: http://www.skyuser.co.uk/forum/extracting-sky-router-passwords/19953-getting-your-v1-v2-router-passwords-safe-way.html#post126268. That one finally led here: https://www.cm9.net/skypass/

I just needed to know the model of my dead Sky modem router (DG834GT) - there's a description of all the models, so getting it right is a no-brainer. I just entered the MAC address on the bottom of the Sky modem router to a form and hey presto, my username and password were writ large on the screen:

I then stored this data to a text file and sparked up the old TP-LINK CD again, connecting the modem router cable to the laptop. The settings required (or worked) for my setup were:

  • Country: UK
  • ISP: Sky Broadband
  • WAN Connection Type: PPPoA
  • VPI [0-255]: 0
  • VCI [32-65535]: 38

Your Security Settings are up to you, but ensure that you store the Security Key as you may need to use it to access the wireless connection.

9 Mar 2013

Using Subversion in Dreamweaver

When I started out, creating a few hobby sites, I came across subversioning (or something like it) and read that it was a great tool for teams working on the same files. So, not for me then, a lone coder, with limited skills. As time went on, and I started creating more complicated sites, using new technologies (well, new to me anyway), I found my workflow becoming chaotic, with loads of open files on CSS, php, js, XML etc, etc. I needed structure - especially when it came to overwriting files that bust my new shiny site, which I then had to fix by hitting the undo button 20 times, or in a worse case scenario, re-write as I'd already closed the offending file. So, Subversion to the rescue. Er, well not quite that simple. I occasionally use Dreamweaver (CS5) to develop some sites, so I was looking at it to perform as a client, only to find that it doesn't have full client capabilities, but on further reading, this isn't such a handicap as it simplifies matters considerably. In order to get Subversion up and running on my system, I first had to get a server version (msi) from here: http://www.visualsvn.com/server/download/. Then I installed it - which took a long time! - and ran it. It gave a typical installation window, which requires some parameters for setup. The main one being location. I didn't fancy placing the repositories in my root folder, so I chose a folder in my XAMPP installation. The port options available to me were 443 and 8443. Once setup, VisualSVNServer then provides you with an https url for use with your client (Dreamweaver in my case) and browser view, in the format:
https://computername:port/svn/.

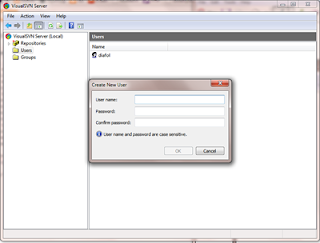
You won't be able to use this until you set up an user account, so, to do that, right-click on the 'User' folder in the left panel and 'Create User'. You should then see a dialog box asking you to provide details. This will be used for client access later on in Dreamweaver.

The next step is to create a new repository for your site, simply by right-clicking on 'Repositories' and choosing 'Create New Repository...'. You'll see a dialog box asking for the repository name - so give it a name - and you have the option of setting up additional structure such as branches etc. You may not need this, so feel free to not tick the check box at this point. You can always go back and add structure later on.
Right, that should do it for the server bit. Now on to adding Subversion (SVN) server details to our site in Dreamweaver. So, get into your site setup and enter the details similar to below (the scratched out entry is just the computername from the Subversion server url - without the 'https://' bit). Also ensure that you enter the correct port.

To avoid confusion 'diafol' in the 'Repository Path' is the name of the Repository I set up earlier - nothing to do with the username. Okay, once you've filled out the details, try testing it, and once saved, away you go!
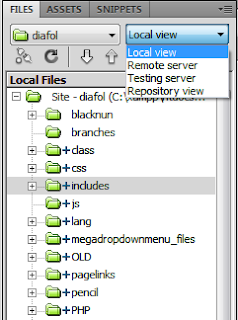
The first thing you'll notice is the little '+' icons next to all your files and directories in the 'FILES' panel. In addition, you'll now have a 'Repository View' in the Servers View dropdown:

So how to get it to work?

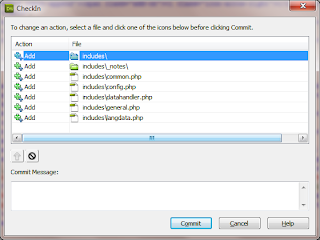
Simply use the Check In and Check Out options from the shortcut menu when you right-click on a file or folder in 'Local view'. When you want to save a version to the repository, use Check In. You should then get a dialog asking you for the action required:

Once you've made your choice, press the 'Commit' button. The little '+' icon next to the file or folder should then disappear. If you now make changes to a file and save it and then 'Check In', you can check whether you have various revisions, either from 'Local view' or 'Repository view'. If you go to 'Repository view' and right-click on the file in question (common.php in this case), you'll get a shortcut menu.

Select 'Show revisions...' and you should see a list of revisions for that file:

You can then view a revision, or usefully, make a previous version the current one. This can then roll back your local version to the selected one on 'Check Out'.
I hope you found this post useful and that using SVN / Subversion is not as scary as it might first appear. Obviously, I've only scratched the surface and be aware that other alternatives to SVN exist. However, for day-to-day stuff for the average DIY hobbyist, this pretty much covers most of my needs.

8 Mar 2013

GETTEXT Issues Fix with php-gettext

Having written a few posts on the merits of GETTEXT and .po files, I ran into an issue revolving around difficulties updating the .po files. It only seemed to work when I changed the location of the localization directory. I assumed that this was due to the files remaining in memory or being cached. This, it seems is a 'well known issue', although I'd never heard of it and trying to find information about it was very difficult. I came across this site: http://blog.ghost3k.net/articles/php/11/gettext-caching-in-php, which describes the phenomenon and offers a workaround. Although the workaround looks quite nice, I thought that this was a fudge and wanted an alternative.
I then came across php-gettext. This can be downloaded from https://launchpad.net/php-gettext/. This has the added bonus of providing a locale even if it isn't installed on your system. Following a bit of testing and jiggery-pokery, I finally got it to work, as follows:

  1. Unpack the archive and copy the contents somewhere on your system.
  2. Create a new directory to store the essential files - I placed them in my config folder, shown highlighted.
  3. Next include the phpgettext.php file, e.g.
    include('config/phpgettext.php');
  4. The next step is to change your
    echo _("...")
    gettext statements to
    print T_("...")
    It may be easier to do this with a find and replace in your text editor or IDE. For example:
    <?php print T_("Place text here");?>
  5. If using PoEdit, you can add the 'T_' keyword to the catalogue:
That worked like a charm for me, so pretty much 'out-of-the-box'. Now no cache problems and it seems to work equally well on Windows and Linux. :)

3 Feb 2013

Creating linked Select Dropdowns from MySQL

Getting linked Data from MySQL

We can often get into a tizz over trying to format data output from the database by using SQL queries. If the solution is straightforward, that's fine, but often it's a lot of work for nothing, as we have php as a means to process this data and to change it to anything we may need. I'm firmly of the opinion that you should let MySQL just get the data. So, lets look at an example where we need to extract country, state and city data for our linked select dropdowns. BTW - this is for static data, not Ajax-driven. I sometimes wonder why the server needs to be involved every time a select dropdown is clicked. Typically, this data will have the following format:
[Country]
country_id [PK, int]
country [varchar]

[State]
state_id [PK, int]
state [varchar]
country_id [int]

[City]
city_id [PK, int]
city [varchar]
state_id [int]
The simplest way of getting this info would be to run 3 SQL queries, but in order to keep things a little more ordered, lets created a multiple JOIN SQL. This will ensure that we don't have a situation where we get orphaned data in our selects, e.g. countries that have no corresponding states, or states that have no cities.
Here's an example of some SQL (MySQL-flavoured):
 SELECT c.country_id, c.country, s.state_id, s.state, i.city_id, i.city 
 FROM country AS c 
  INNER JOIN state AS s 
   ON c.country_id = s.country_id 
  INNER JOIN city AS i 
   ON s.state_id = i.state_id 
 ORDER BY c.country, s.state, i.city
This could give us the following type of data if we return an array from the resource:
$dbarr = array(
 array(1,'Canada',7,'Ontario',100,'Pembroke'),
 array(1,'Canada',8,'Quebec',101,'Laval'),
 array(1,'Canada',8,'Quebec',102,'Montreal'),
 array(1,'Canada',8,'Quebec',103,'Quebec'),
 array(2,'USA',10,'CA',300,'Los Angeles'),
 array(2,'USA',10,'CA',301,'San Diego'),
 array(2,'USA',11,'NY',302,'Buffalo'),
 array(2,'USA',11,'NY',303,'New York'),
 array(2,'USA',12,'VA',304,'Chesapeake'),
 array(2,'USA',12,'VA',305,'Norfolk')
);
Next, we put the data into a form that can be easily dealt with by javascript (jQuery), namely, json. This is incredibly easy to do in php, with json_encode(). Okay, on with the php bit:

Converting php Data to JSON

//Indentify the fields from the output array - so that we can create a well-formed arrays
$keys = array('country'=>array(0,1),'state'=>array(2,3),'city'=>array(4,5));

//This just gives some hooks for javascript and the select dropdown 'id' properties
$json_keys = json_encode(array_keys($keys));

//Create the arrays
function makeArrays($data,$keys){
 foreach($data as $record){
  $pos = 0;
  foreach($keys as $k=>$v){
   if($pos == 0){
    $r[$k][$record[$v[0]]] = $record[$v[1]];
       
   }else{
    $r[$k][$prev][$record[$v[0]]] = $record[$v[1]];
   }
   $prev = $record[$v[0]];
   $pos++;
  }
 }
 return $r;
}

//encode the data for use in javascript
$json = json_encode(makeArrays($dbarr,$keys));
So as you can see, pretty minimal stuff so far. The HTML selects need to have the same id properties as the fieldnames in the $json_keys variable ('country', 'state', 'city'):

Our Minimal HTML

<select id="country" class="linkedselects"></select>
<select id="state" class="linkedselects"></select>
<select id="city" class="linkedselects"></select>
You'll notice the class 'linkedselects' - this is important for the javascript.

Getting jQuery to Populate the Select Dropdowns

Right, so far so good, now for the jQuery-fuelled javascript:


That seems to be all that there is to it. You may notice the distinct lack of 'country', 'state' and 'city' in the javascript. This is deliberate, as you should be able to use the code with any similarly formatted data. In addition, you should be able to extend it to however many linked select dropdowns that you need. Here's the output:

**UPDATE (03/02/2013)**

Thought I'd expand on the extending the use. The changes required for 4 linked dropdowns - just the last line as the array is created from the DB:
$dbarr = array(
 array(1,'Canada',7,'Ontario',100,'Pembroke','1000','John'),
 array(1,'Canada',8,'Quebec',101,'Montreal','1001','John1'),
 array(1,'Canada',8,'Quebec',101,'Montreal','1002','John2'),
 array(1,'Canada',8,'Quebec',103,'Quebec','1003','John3'),
 array(2,'USA',10,'CA',300,'Los Angeles','1004','John4'),
 array(2,'USA',10,'CA',301,'San Diego','1005','John5'),
 array(2,'USA',11,'NY',302,'Buffalo','1006','John6'),
 array(2,'USA',11,'NY',303,'New York','1007','John7'),
 array(2,'USA',12,'VA',304,'Chesapeake','1008','John8'),
 array(2,'USA',12,'VA',305,'Norfolk','1009','John9')
);
$keys = array('country'=>array(0,1),'state'=>array(2,3),'city'=>array(4,5),'user'=>array(6,7));
And the HTML - again just add another select dropdown:


And that's all there is to it. Here's a screenshot:

30 Jan 2013

Supporting (X)GETTEXT on Windows - From the Ground Up

Background Info

So, you may have fiddled with GETTEXT in your php files or you may have used PoEdit to translate an app or a site. Well, that's pretty much as far as you can go with these unless you want to go further by using XGETTEXT on the command line to produce your own .pot file for distribution (or your own use, come to that).
If you read a previous article: Creating .pot Files in PoEdit for Translators, you'll remember that PoEdit can create these for you - well, it can, but not fully-featured .pot files. PoEdit has been developed to create and edit .po files, not .pot files, which I got from the horse's mouth, author Václav. Slavik. So what's the difference?

.pot vs .po Files

.pot files are meant as templates for producing other localizations and shouldn't be used to create the all important .mo files. W e can use Gnu's (X)GETTEXT.

Get XGETTEXT for Windows

XGETTEXT works off the Unix command line, so it can't be run natively on Windows, but the clever people at Gnu have provided a Windows version here - GnuWin32.
Follow the link, download and install the package.
You may install it anywhere, but don't place it in the root directory. When installed, you may have something like the image on the right.
Congratulations, you've now installed XGETTEXT. Well. Almost.
In order to get ease of use out of XGETTEXT, you'll need to make the executable commands available from everywhere, other than just the gnuwin32/bin/ directory. For this, we need to add a path to our Windows Environment Variables.

Add a Path to gnuwin32

  1. Right-click on Computer (or My Computer) in the Start Menu choose Properties in the displayed shortcut menu.
  2. On the Properties dialog, click on the Advanced Systems Settings link:
  3. Then, press the Environment Variables... button on the Advanced tab.
  4. Then on the next dialog, choose Path in the System Variables box (or use User variables, if you only want to add XGETTEXT for yourself). Then press Edit...
  5. Now add a path to the directory where the gettext executables live. For me it was: C:\Program Files (x86)\gnuwin32\bin, but your installation may be different. You must separate this path from the last existing one with a semi-colon (;):
  6. Ok, now we should be done with setting up XGETTEXT on Windows - we just need to test it, so open up the command prompt (cmd.exe) and lets type:
    C:\> xgettext --help
    You should then see something that ends like this:

XGETTEXT Commands and Options

I've been informed on many a website that the XGETTEXT documentation is excellent. I really don't want to disagree, but unless you're a unix-junkie and have experience in decoding hieroglyphics, you won't find this easy-to-follow documentation. It gave me a nosebleed! Mind you, it may say more about me than the documentation. So, how do you get it to work? Well, it's surprisingly easy if you ignore the --help menu, which by the way, also makes very little sense.
You may think that I'm being a bit unfair, and yes, I suppose I am, since once you understand the various options and the syntax, it does kind of make sense.

Examples of Command Line Statements to Build a (.pot) File

Before I just give a blind example, I'll run through the basic structure:
ElementDescription
Set Directories-D
e.g. -D c:/xampp/htdocs/timetabler/includes/*.php c:/xampp/htdocs/timetabler/mainsite/*.php
This describes a list of all the directories that hold files that contain your gettext strings. Directories are separated by a space.
Adding translator comments -c
A plain -c will add all php comments that precede the gettext strings as 'Notes for Translators'.
-c[tag]
e.g. -cTRANSLATORS
You may add a tag to this which will only extract the comments starting with this string.
You should note that successive comments between this and gettext strings will be included too. The tag option is useful if you have general comments directly preceding your specific translator comments. This prevents them from being included.
Sorting strings by file location -F
This will group gettext strings according to directories.
Search for strings -k[keywordspec]
e.g. -k__
This gets the keywords, like a prefix, for which to search to identify gettext strings, e.g. __ refers to something like echo _('hello'); so the __ means _(...).
Apply encoding --from-code=name
e.g. --from-code=UTF-8
You should use this if your files may contain non-ASCII text.
File language -L langname
e.g. -L php
This helps xgettext to know how to parse the files containing the gettext strings and comments.
Output location -p directory
e.g.1 -p c:/xampp/htdocs/timetabler/lang (absolute path)
e.g.2 -p timetabler/lang (relative reference)
This sets the directory for saving the output .po file. If this is not included, the file will be saved to the relative directory from where the xgettext command is run.
Output filename -o filename
e.g. -o mytemplate
The setting above will create a file called mytemplate.po.
Add filename and line info-n
This generates the #: filename: line lines in the .pot file, which can be displayed in PoEdit by right-clicking the string to be translated.
So armed with the codes above, you should now be able to enter something like the following at the command prompt:
C:\> xgettext -n -c -D c:/xampp/htdocs/diafol/includes/*.php c:/xampp/htdocs/diafol/config/*.php --from-code=UTF-8 -k__ -L php -p c:/xampp/htdocs/diafol/lang/orig -o mytemplate.pot
Breaking down this into parts, we're trying to:
  1. Add filename lines to the output file (-n).
  2. Add translator comments to the output file -c. No particular tag.
  3. GETTEXT strings can be found in files with .php extension in c:/xampp/htdocs/diafol/includes/ and c:/xampp/htdocs/diafol/config/ directories.
  4. Fix the encoding to UTF-8 --from-code=UTF-8
  5. Search the .php files for the _(...) format strings (-k__).
  6. Let XGETTEXT know that you're using input files using the php language (-L php).
  7. Output the new file to the c:/xampp/htdocs/diafol/lang/orig directory.
  8. Name the file mytemplate.pot (-o mytemplate.pot)

Plural Forms

One thing that I have not covered is the 'plural forms' aspect. A simple case could be with regard to something like: '1 click' or '2 clicks', where there are a number of formats depending on how many subjects that you have. This can be quite complicated as different languages will have different plural forms. For example, English is relatively simple: 'click' singular would be applied to just the digit 1, but all others 0,2,3,4,5... as 'clicks', but other languages may have a very different pattern.
So how do we go about treating plural forms properly? It seems that we have to get a bit crafty in our source files, using the ngettext keyword. I have to admit, I struggled to find decent resources on this with php, but with a bit of fiddling, I believe that I managed to find a working method.
If XGETTEXT knows that we're working with php files, it should automatically pick up the ngettext keyword, so DON'T include this as a keyword in the command line. If you do, you may find that you produce a single string entry for translation and not a plural entry.
Here's a trivial example of ngettext() in a source file:
printf(ngettext("%d file", "%d files", $num), $num);
Once you've run your XGETETXT in the command line, open up the new .pot in a text editor and you should see something like this:
#: c:/xampp/htdocs/timetabler/includes/step1.php:20
#, php-format
msgid "%d file"
msgid_plural "%d files"
msgstr[0] ""
msgstr[1] ""
As far as manipulating creating the .pot file via the command line, we're done, but let's look at a better example. The following code is pretty poor with regard to php, but it's just for illustration purposes, with the focus on ngettext() and _().
<?php
//temp display variables
$num= 1;
$username= "diafol";
$email = "diafol@example.com";

//Form label
$user_label = _("Username:");
//Form label
$email_label = _("Email:");
//Form button label
$submit_label = _("Change Email");
//You must include %d as is 
$lastvisit = ngettext("Your last visit was %d day ago", "Your last visit was %d days ago:", $num);
?>
  
<p><?php printf($lastvisit,$num);?></p>   
<form id="profile" name="profile" action="scripts/profile_handler.php" method="post">
 <label for="username"><?php echo $user_label;?></label>
 <input id="username" name="username" value="<?php echo $username;?>" disabled="disabled" />
    <label for="chemail"><?php echo $email_label;?></label>
 <input id="chemail" name="chemail" value="<?php echo $email;?>" />
    <input type="submit" name="submitprofile" id="submitprofile" value="<?php echo $submit_label;?>" />
</form>
This code gives the following form:
If we change the $num variable to:
//temp display variables
$num= 7;
You should see:
So, we can confirm that the printf()/ngettext() is working as expected in the native language. Okay, here comes the magic bit again, lets run our XGETTEXT:
xgettext -n -c -D c:/xampp/htdocs/timetabler/includes/*.php c:/xampp/htdocs/
timetabler/config/*.php --from-code=UTF-8 -k__  -L php -p c:/xampp/htdocs/timetabler/lang -o messages.pot
This should produce a file messages.pot with something like the following content:
# Copyright (C) YEAR THE PACKAGE'S COPYRIGHT HOLDER
# This file is distributed under the same license as the PACKAGE package.
# FIRST AUTHOR <EMAIL@ADDRESS>, YEAR.
#
#, fuzzy
msgid ""
msgstr ""
"Project-Id-Version: PACKAGE VERSION\n"
"Report-Msgid-Bugs-To: \n"
"POT-Creation-Date: 2013-01-30 00:18+0000\n"
"PO-Revision-Date: YEAR-MO-DA HO:MI+ZONE\n"
"Last-Translator: FULL NAME <EMAIL@ADDRESS>\n"
"Language-Team: LANGUAGE <LL@li.org>\n"
"MIME-Version: 1.0\n"
"Content-Type: text/plain; charset=CHARSET\n"
"Content-Transfer-Encoding: 8bit\n"
"Plural-Forms: nplurals=INTEGER; plural=EXPRESSION;\n"

#. Form label
#: c:/xampp/htdocs/timetabler/includes/step1.php:8
msgid "Username:"
msgstr ""

#. Form label
#: c:/xampp/htdocs/timetabler/includes/step1.php:10
msgid "Email:"
msgstr ""

#. Form button label
#: c:/xampp/htdocs/timetabler/includes/step1.php:12
msgid "Change Email"
msgstr ""

#. You must include %d as is
#: c:/xampp/htdocs/timetabler/includes/step1.php:14
#, php-format
msgid "Your last visit was %d day ago"
msgid_plural "Your last visit was %d days ago:"
msgstr[0] ""
msgstr[1] ""
We can see the 'Notes for Translators' comments with the #.-prefixed lines, the filename: line comments, prefixed by #: and the plural format with the msgid_plural key.
We are now ready to edit the file in order to make it distributable. We should edit certain parts of the messages.pot file directly.

Editing Parts of the .pot file Directly

Open up the messages.pot file in a text editor and apply your info, for example, the default:
# SOME DESCRIPTIVE TITLE.
# Copyright (C) YEAR THE PACKAGE'S COPYRIGHT HOLDER
# This file is distributed under the same license as the PACKAGE package.
# FIRST AUTHOR <EMAIL@ADDRESS>, YEAR.
#
#, fuzzy
msgid ""
msgstr ""
"Project-Id-Version: PACKAGE VERSION\n"
"Report-Msgid-Bugs-To: \n"
Could be changed to this:
# Translation File for diafolCode TIMETABLER. Download the package from http://www.example.com/downloads).
# Copyright (C) 2013 ALAN DAVIES
# This file is distributed under the same license as the diafolCode TIMETABLER package.
# ALAN DAVIES <diafol@example.com>, 2013.
#
#, fuzzy
msgid ""
msgstr ""
"Project-Id-Version: diafolCode Timetabler 1.01b\n"
"Report-Msgid-Bugs-To: http://www.diafolcode-bugs.example.com\n"
Finally, we've produced our finished messages.pot file. It is now ready for distribution. Either as a downloadable .pot file, or as part of the whole package, if this is to be distributed.

24 Jan 2013

The Forthcoming Death of MySQL*

Before you start panicking – no, MySQL databases aren't dead, just that pHp's way of manipulating these databases has changed. At the time of writing, we're at php version 5.4.11 and the php manual states:
This extension is deprecated as of PHP 5.5.0, and will be removed in the future.

So, what do we do?

Well, there seems to be two main alternatives, both of which have been banging about for some time: mysqli and PDO.

Why the Change?

I suppose you ask 10 people and you get 10 diffrent answers, but for me it's the mysql_query() function, which is a potential hole-digger from the point of view of SQL Injection. We usually protect ourselves with the old mysql_real_escape_string() function on our inputs and think that we're safe. This is covered in greater detail elsewhere, so without plagiarizing the sources, I recommend a read of the following: Both PDO and Mysqli allow parameterized queries and follow an object orientated approach, which makes handling queries a lot safer and easier.

Which one Should you Use?

Each has its fanboys and detractors, but both will get the job done. Personally, I prefer the PDO syntax and I can easily create wrapper classes for it. For a quick syntax check of these, you can check out the php manual: For some examples of use, pritaeas has some nice ones over on Daniweb:

Wrappers?

For those of you interested in wrapping up PDO so that it has a nice user-friendly client interface, there are many examples out there. One of my favourites when I started was from php-pdo-wrapper-class located on Google Code. Since then, I tend to roll my own, usually as singletons. This is a contentious thing to do and there are many good arguments against using singletons in general. However, in my experience, programming is often a compromise between many factors, which often include convenience.

21 Jan 2013

Bind Events to Dynamically-Added Elements with jQuery's .on()

This post follows one from another - Adding Form Controls Dynamically with jQuery. AT the end of that post, I mentioned that dynamically added form elements can often not have pre-defined events assigned to them as these elements are added after page load. Here's an example of adding a few textboxes to a form along with an associated button for incrementing the textbox value. This is just a trivial example, just to show the issues that can arise.
<form id="frm_numbers" method="post" action="anotherpage.php">
    <label for="tb_addinputs">No. Inputs to Add: </label> 
    <input id="tb_addinputs" type="number" min="1" max="6" value="1" /> 
    <button id="btn_addinputs">Add Inputs</button><br />
    <button id="btn_sync" style="display:none;">Sync All To First</button><br />
    <input type="submit" value="Upload" name="submit" id="submit" />
</form>
Here's some of the accompanying javascript, which all works fine:
<script src="//ajax.googleapis.com/ajax/libs/jquery/1.8.3/jquery.min.js"></script>
<script>
$(function(){
    //Extend native from http://bit.ly/11MheU1
    String.prototype.repeat = function(num) {
        return new Array(isNaN(num)? 1 : ++num).join(this);
    }
        
    //Add specific number of controls and show sync button
    $('#btn_addinputs').click(function(e){
        e.preventDefault();
        addNewTextInputs();
        $('#btn_sync').show();
    });
    
    //general function to add text inputs    
    function addNewTextInputs(){
        var str = '<label>MyNumber</label> ';
        str += '<input class="tb_numbers" type="number" value="0" />';
        str += '<button class="btn_addten">+10</button><br />';
        var numToAdd = parseInt($('#tb_addinputs').val());
        $('#btn_sync').before(str.repeat(numToAdd));
    }

    //sync button click to make all text inputs equal to the first one
    $('#btn_sync').click(function(e){
        e.preventDefault();    
        if($('.tb_numbers').length > 1)$('.tb_numbers').val($('.tb_numbers').eq(0).val());
    });
});
So, if we add 5 inputs, we get this:
OK, so far so good. If we manually change the inputs and press 'sync', again everything works fine.
Now the problem arises when we try to attach a .click event to the 'Add Ten' buttons, so that they can add 10 to the value in the associated number input. If the button was present on page load, then we could do this:
$('.btn_addten').click(function(e){
    e.preventDefault();
    num = parseInt($(this).prev().val()) + 10;
    $(this).prev().val(num);        
});
Unfortunately, this won't work, so we have to resort to using the .on() method, which is no hardship:
$("#frm_numbers").on("click", "btn_addten", function(e){
    e.preventDefault();
    num = parseInt($(this).prev().val()) + 10;
    $(this).prev().val(num);
});
Magically this does the business - click the 'Add Ten' button and the associated number input increments by 10.
OK, you can argue that this isn't the most inspiring of scripts, but at least it shows how you can bind an event to a dynamically-added element.